Over the past week I've been toying with the idea of moving the High Five, You Rock mastodon bot off of my Raspberry Pi and moving it on to a hosted service e.g. Umbraco Cloud.
The original bot is written in Python but sometimes it goes offline because my raspberry pi gets turned off or crashes for any reason. So I'm now looking at writing the bot in C# and hosting it on this website as an API call which I can hit with Hangfire every 15 mins or so. But that's not what this blog is about.
I was having issues authenticating with the Mastodon API and after a conversation with Warren Buckley he suggested I have a look at using a package built by Umbraco called - Umbraco Authorized Services.
Umbraco Authorized Services is an Umbraco package designed to reduce the effort needed to integrate third-party services into Umbraco solutions.
Quoted from : umbraco.com
Giving it a go
I plan to write another blog about actually building the Mastodon bot, setting up the API keys etc. but this is just how I used this package to authenticated with the API.
Firstly, I opened up my local copy of this website and installed the Authorized Services package via NuGet and that worked without any issues.
Next I opened up my appsettings.json file and added some configuration settings :
    "AuthorizedServices": {
    "TokenEncryptionKey": "",
    "Services": {
        "MastodonService": {
            "DisplayName": "Mastodon",
            "ApiHost": "https://umbracocommunity.social",
            "IdentityHost": "https://umbracocommunity.social",
            "TokenHost": "https://umbracocommunity.social",
            "RequestIdentityPath": "/oauth/authorize/",
            "RequestTokenPath": "/oauth/token",
            "RequestTokenFormat": "FormUrlEncoded",
            "AuthorizationUrlRequiresRedirectUrl": true,
            "UseProofKeyForCodeExchange": true,
            "ClientId": "<<my_client_id>>",
            "ClientSecret": "<<my_client_secret>>",
            "Scopes": "read write "
        }
    }
}
Installed
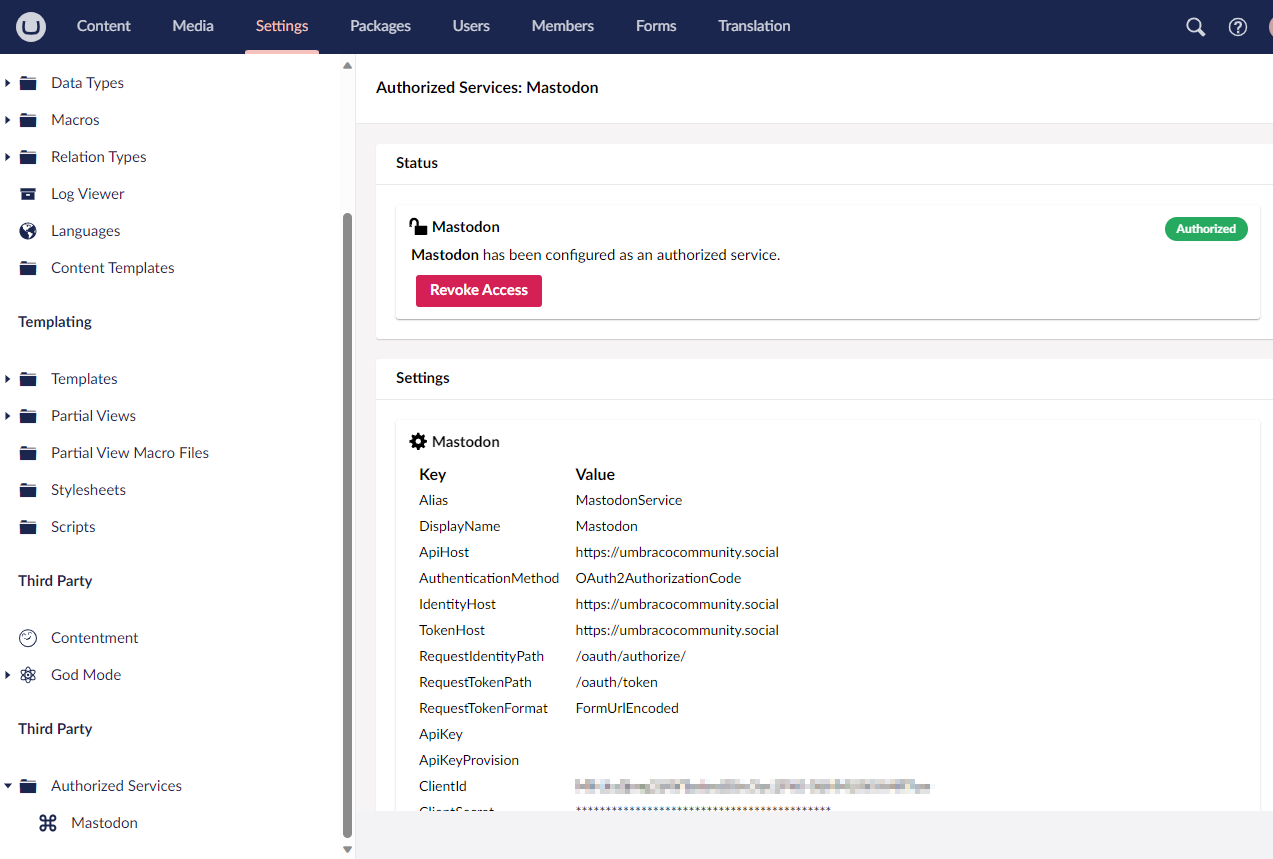
Once all the settings are added you can spin up your website and in the backoffice you'll see a new section under Settings
First issue
My first issue, which I didn't realise was an issue was I copied the appsettings from the official documentation and the docs had a mistake in them.
The example I used said I should use a property alias of AuthorizationRequestsRequireRedirectUri but the actual documentation says this property should be named AuthorizationUrlRequiresRedirectUrlit's similar but one works and the other doesn't.
Big shout out to Anders Bjerner for spotting this when I raised my issues on the Umbraco Discord channel.
I've since made a Pull Request to the Umbraco Documentation to fix this mistake.
Second issue
Once that was fixed I then had to add my localhost url to the app which was within the developer settings on my Mastodon account. This had to be a fully qualified url and again, thanks to Anders, he pointed me in the correct direction for what the url should look like, in my case it should be, https://localhost:44365/umbraco/api/AuthorizedServiceResponse/HandleOAuth2IdentityResponse
Before then I didn't have a url in there and I was getting an error - The redirect uri included is not valid
In the backoffice I was able to now authenticate / revoke access to my App on Mastodon. Happy days!
Thanks everyone for their help and suggestions.